安装cocoapods
cocoapods是iOS开发中管理第三方开源库的工具,使用它可以很方便的在我们的项目中集成第三方工具。它可以很方便的将第三方开源库导入我们的项目并配置好所有设置,大大减少了开发的工作量。本文比较简单的介绍了安装cocoapods的步骤和怎么通过cocoapods导入第三方库,关于具体的原理和说明以及注意事项这里就不做具体的描述。关于cocoapods的安装和使用说明可以参考官方文档,里面有具体的使用说明。
1.安装cocoapods命令如下:
$ sudo gem install cocoapods
$ pod setup
Setting up CocoaPods master repo
  $ /usr/bin/git clone https://github.com/CocoaPods/Specs.git master --progress
  Cloning into 'master'...
  remote: Counting objects: 2334356, done.
  remote: Compressing objects: 100% (287/287), done.
  remote: Total 2334356 (delta 118), reused 52 (delta 37), pack-reused 2334022
  Receiving objects: 100% (2334356/2334356), 559.65 MiB | 889.00 KiB/s, done.
  Resolving deltas: 100% (1347074/1347074), done.
  Checking out files: 100% (256741/256741), done.
2.安装完成之后,查看安装目录如下:
$ gem which cocoapods
/Users/username/.rvm/gems/ruby-2.5.1@global/gems/cocoapods-1.5.3/lib/cocoapods.rb
cocoapods添加第三方库到自己的项目
1.cd到自己的Xcode项目目录新建一个Podfile,并用Xcode打开编辑
$ touch Podfile
$ open -a Xcode Podfile
在该文件中加入如下内容:
target “AFNetWorkingDemo” do
source ‘https://github.com/CocoaPods/Specs.git’
platform :ios, ‘8.0’
pod ‘AFNetworking’, ‘~> 3.2.1’
end
2.运行pod安装命令安装第三方库
$ pod install
Analyzing dependencies
Downloading dependencies
Installing AFNetworking (3.2.1)
Generating Pods project
Integrating client project
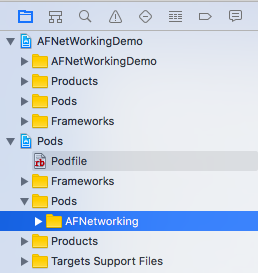
执行完成之后,需要使用AFNetWorkingDemo.xcworkspace文件来打开工程即可在项目中使用第三方库。工程目录如下:

注意事项
1.Podfile和Podfile.lock
Podfile是指定要使用的所有第三方库各种信息的文件,包括版本信息。Podfile.lock文件是对已经安装的第三方库版本追踪文件,用于保持版本的一致性。该文件由pod install和pod update命令生成。这两个文件一般需要添加到版本控制管理中,这样可以保证项目中所有人使用的第三方库版本保持一致。如项目来了一个新人,clone好项目之后,调用pod install命令添加第三方库,cocoapods就会根据Podfile.lock文件安装好对应版本的第三方库。
pod install命令只有第一次还没有生成Podfile.lock文件的时候调用才会生成Podfile.lock文件,否则都是会根据Podfile.lock文件来进行安装操作。
2.添加和删除第三方库
添加或者删除一个第三方库的时候要用pod install命令,查看是否有可以升级的第三方库用pod outdated命令。更新需要升级的第三方库是使用pod update PODNAME命令。如果不带参数的调用pod update命令,就会更新Podfile中所列的所有第三方库到最新版本。此时会重新生成一个新的Podfile.lock文件。
pod install命令的官方文档描述如下:
This is to be used the first time you want to retrieve the pods for the project, but also every time you edit your Podfile to add, update or remove a pod.
- Every time the pod install command is run — and downloads and install new pods — it writes the version it has installed, for each pods, in the Podfile.lock file. This file keeps track of the installed version of each pod and locks those versions.
- When you run pod install, it only resolves dependencies for pods that are not already listed in the Podfile.lock.
- For pods listed in the Podfile.lock, it downloads the explicit version listed in the Podfile.lock without trying to check if a newer version is available
- For pods not listed in the Podfile.lock yet, it searches for the version that matches what is described in the Podfile (like in pod ‘MyPod’, ‘~>1.2’)